I’ve decide to go down a path of figuring out how the @curic4su suite of extensions works and how best to implement them into our work. Yesterday I did a deep dive on Curic DIO 2 (Draw in Object) which includes Curic OI (Offset / Intersect). I found in watching videos (at 50% speed) from TutorialsUp and doing my own experimentation that I was basically writing a tutorial for myself in Notion and it wouldn’t be that much work to share it here. I’m not sure how much interest there would be but I figured it might be worth the feedback that I’d get.
I’m not sure how linking commercially available stuff works so for now I’ll just link to youtube videos.
TutorialsUp’s long and very dense tutorial on DIO.
Curic DIO 2 Plugin For SketchUp
TutorialsUp’s somewhat shorter tutorial on OI.
(note that I got really deep into this and then ran out of time so some items are WIP.
DRAW IN OBJECT

-
Note: The first four buttons only show up during a DIO command. They don’t appear normally. I leave a blank space in the toolbar where they appear so it doesn’t jog all my toolbars over whenever it happens. I also put Curic Stretch settings buttons in the same location. They appear and disappear the same way and would never both be on screen at the same time.
-
“Draw in object” toggle - This tool affects all DIO tools. With it off, these more or less become native drawing tools. With it toggled off, all drawing happens at the top level of context that you’re currently drawing in. With it on, the drawing tools happen at the lowest level of context of the object, or at the level of the object selected for drawing on using CTRL + LEFT CLICK to “Get Object”. In all of the tools this can be toggled with CTRL + TAB.
-
“Create New Object” toggle - ****Trowel-specific setting. Explained below under “Trowel”.
-
“Create Thickness” toggle - **** Trowel-specific setting. Explained below under “Trowel”.
-
“Enable Offset” - Trowel-specific setting. Explained below under “Trowel”.
-
“Line” - allows you to draw lines in objects outside of their context.
- By default, DIO will choose which object you draw in based on where you start the line.
- In red and blue are “SnapDims” which reference the nearest edges of the shape that you’re drawing on. You can keyboard input precise offsets to start your shape, use object snaps in native SketchUp or just freehand click where you want to start drawing.
- In testing I was trying to figure out if the DIO tools can outright replace native sketchup drawing. I discovered that when initially starting to draw a line with DIO Line, I couldn’t shift and lock inferences the way I could with native Line. The shift inferences work once you’ve begun drawing the line but not before your first point. So for that reason I still think it’s worth keeping native Line and Rectangle Tool around.
Inferences with Native Tools vs DIO tools:


- At the top left is the Object Info overlay which tells you what object you’re drawing in, the layer and material of that object, and outliner hierarchy information about that object including number of levels, and the layers and materials attached to those levels. It seems to keep going no matter how deeply nested:

- When you initially start the Line tool, you can either begin drawing or CTRL + LEFT CLICK to “Get Object.” Using CTRL allows you to override the automatic behavior of DIO and choose your own object to draw in. This can be useful for complex models with lots of groups.
- The Line tool stays active for more line segments until you end on an edge or press ENTER.
- Once complete, if “Continue with Trowel” option is toggled on, the Trowel tool is activated. Otherwise, you can continue to draw lines. This applies to all of the DIO drawing tools.
- “Rectangle” - allows drawing 2 point rectangles from outside of context.
- Same notes from DIO Line apply to Rectangle. You can keyboard enter initial offsets from edge using SnapDims. You can CTRL + LEFT CLICK to “Get Object.” Native Rectangle has shift inferencing that DIO doesn’t.
- Before starting to draw, 3D/2D can be toggled with TAB. 3D mode starts a Trowel operation once the rectangle is drawn. More on Trowel below. 2D mode only draws the rectangle.
- “Rotated Rectangle” - allows drawing 3 point rectangles from outside of context.
- Same notes from DIO Rectangle apply to Rotated Rectangle.
- “Polyline” - allows drawing polyline from outside of context.
- The difference between this and “Line” is that it doesn’t stop drawing once you connect to another edge. It wants to draw a contiguous boundary. In fact, if you only draw 2 points and press ENTER, it does nothing. If you draw 3 points and press ENTER, it closes the line.
- Once it closes the line it acts like the rectangle tool. If 2D mode, it’s done. If 3D mode, it goes into Trowel.
- While drawing the line, you can press ESC to undo a point.
- “Circle” - allows drawing circle outside of context.
- Tooltip says press CTRL + (+) or (-) to increase or decrease number of segments but mine didn’t always work like this. Seems to be a bug. It does let me type in the number of segments and press ENTER to change them.
- Other than that, the same notes for DIO Rectangle apply to this.
- “Arc” - allows drawing 2 point arc outside of context.
- For pre-adjusting # of segments, it’s the same deal as Circle tool.
- Works like Native 2 point Arc once started.
- “Trowel” - push/pull and solid tools operations rolled into one, from any context to any context.
- This tool does many many things that I still don’t 100% understand.
- “Create New Object”, “Create Thickness”, and “Enable Offset” toggles only affect this tool.
- Optionally, with “Continue with Trowel” toggled on, the Trowel tool is enabled after all DIO Line, Polyline, Rectangle, Circle, and Arc tools are completed. For those tools that have 3D mode, it immediately begins the trowel. Otherwise, the Trowel is tool is clicked but the push/pull operation not started until you click again on a specific object. If “Continue with Trowel” is toggled off, then those tools continue to be active for repeat operations.
- Initially when activating the Trowel tool you have a few options:
- CTRL + LEFT CLICK to “Get Object” as explained earlier for the other tools.
- LEFT CLICK on a face to begin the push/pull operation on that face.
- LEFT CLICK on an edge to begin the Chalkline operation on that edge. Chalkline is explained more later on in this.
- SHIFT + LEFT CLICK on face to “Select Border” or “Select Hole”. This lets you create a box that is the outside boundary of the face, ignoring any holes that are in it in the case of “Select Border”, and creates a box from the boundary of the hole in the case of “Select Hole”. Notably, this lets you use the tool faster for ordinary push/pull operations.
- SHIFT + LEFT CLICK on an edge to “Filter Face”. I don’t really know what this means. It seems to just be a way to select a face that’s hard to click from the current viewing angle.
- Once you begin the push/pull operation with Trowel, you have more options:
- You can input a distance or click to finish the operation. It will push/pull the face, cut a hole in the face, cut the hole and create a box in it’s place, or create a box and cut no hole, depending on how the Trowel settings toggles are set.
- You can tap SHIFT to move the boundary being troweled prior to starting the pushpull operation automatically after. It is a straight two click operation after pressing SHIFT and you can use Sketchup inferences and keyboard inputs to move it precisely.
- You can tap TAB to reverse the solid tools operation. It seems to use Subtract by default and tabbing turns it into a Union which means it can’t cut a hole but only add more geometry. I haven’t researched this much.
- You can CTRL + TAB to toggle DIO off. This lets you change your mind and decide to make a new box outside the object.
- You can CTRL + LEFT CLICK to “Get Object” as before. I don’t know what purpose this serves though.
- You can shortcut into native Move, Rotate, and Scale tools DURING the push/pull. Once you’re done with those tools, it will resume the push pull. TutorialsUp video demonstrates a use case for this.
- It is possible to use scale, rotate, and move tools on faces being created by DIO. This doesn’t interrupt the tool, once you’re done transforming, it will go straight to the trowel if you have that setting turned on.
- Other options with Trowel are available via right click menu:
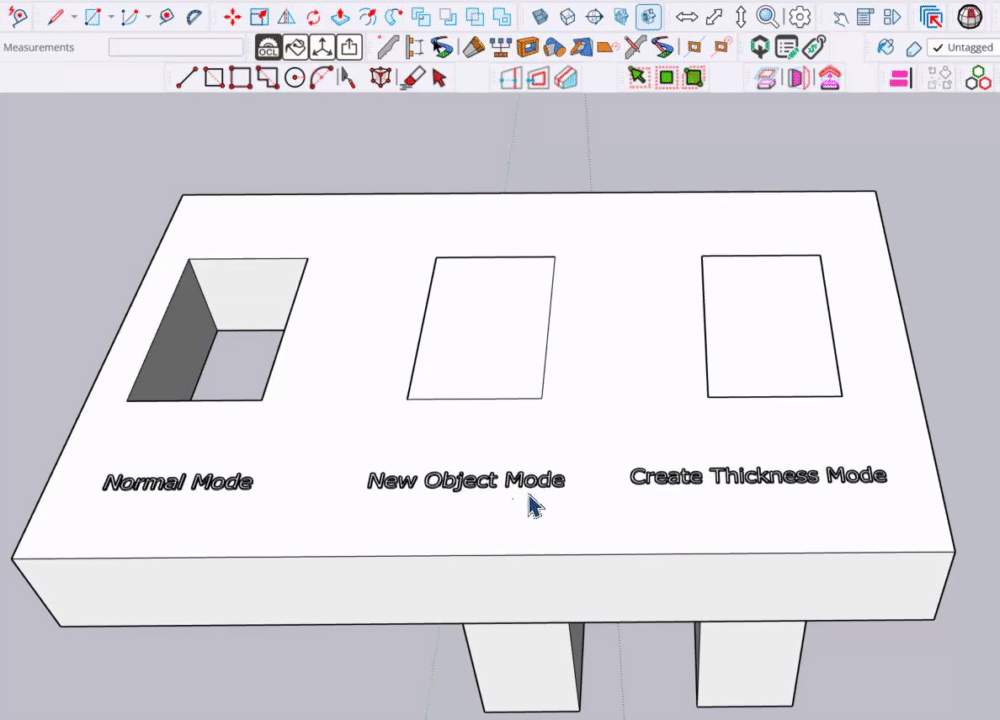
- “Create New Object” toggle - *Determines whether the trowel shape is a new object or a part of the object being drawn in. If it’s toggled, the object will be created on the same level as the object, but separate from it. By default, the new object is a group. Optionally, it can be a component named “Object#X”.
- If the “Mode Style” toggle in the right click DIO settings is set to “Continue the Current”, this toggle will stay on once it’s activated. If it’s set to “Return Edit Mode”, it will turn off with each use of Trowel and have to be reactivated if you want to do it again. THIS TOOK ME FOREVER TO FIGURE OUT. These settings also apply to “Create Thickness”.
- For both New Object and Create Thickness, these can be toggled by right click menu during the trowel operation.
- “Create Thickness” toggle - **** This will create a new object in place when doing a negative “cutting” operation with the push pull. It toggles “Create New Object” off when it is turned on, and vice versa. This new object is always a group. Unlike “New Object,” this will still cut the hole in the original object.
- “Create New Object” toggle - *Determines whether the trowel shape is a new object or a part of the object being drawn in. If it’s toggled, the object will be created on the same level as the object, but separate from it. By default, the new object is a group. Optionally, it can be a component named “Object#X”.
Difference between Normal mode, Create New Object mode and Create Thickness mode:

- “Enable Offset” - When on, this lets you hover over the boundary being troweled (during the push/pull operation), LEFT CLICK on it to use the Offset tool and do an offset instead. Note that whether this is turned on or not, you always can hover over an edge prior to engaging Trowel to do a Chalkline. I leave this on.

Difference between Enable Offset On and Off:

-
Slice Face - WIP, TutorialsUp video shows this being used once.
-
Coplanar Intersection - WIP, TutorialsUp video shows this being used once.
-
Pick Zone - WIP, don’t remember if the video has this.
- The trowel tool is bad ass and completely replaces push/pull. You can make holes in things but just troweling back past the face instead of having to exactly nail the depth of the hole like with the push/pull tool. It can also do non-perpendicular cutouts unlike the native tool.
-
“BoundingBox” - WIP
-
“Erase” - WIP
-
“Select” - WIP
This ended up being about 100 times more complicated than I expected. Would there be an interest in this type of explanation of other Curic tools? I would be writing this for myself anyway because it helps me get a full understanding of them. I would do OI next, then probably Stretch. And this seems to be one of the most complex of his tools. I also have a pretty deep understanding of Curic Section.
Paging @PaulMcAlenan
24 posts - 7 participants